I always try to match the original Haqqislam painting theme as close as i can. This guide here is just my approach and a kind of personal knowlewdge base.
One thing in advance, I am certainly not a professional painter. I’ve always liked to come up with my own color schemes, but I wanted to finish quickly so I could play with the figures. Dry brushing was therefore always my best friend.
When I started with Infinity, I tried to paint „properly“ for the first time. Using a wet palette, painting highlights instead of just dry brushing and stuff like that.
Especially since the great Studio color scheme painting of the Haqqislam figures first led me to this tabletop, so I really wanted to recreate that painting on my miniatures as well.
To start painting Haqqislam miniatures I can only recommend the Step-by-step Painting Guide by Angel Giraldez. This will not only give you a Ghulam Forward Observer miniature, but also an understanding of the basic colors he uses for this faction’s miniatures.
Still, by no means all colors are mentioned there, the color scheme differs significantly for some figures.
Since I only really get to paint once in a while, and don’t want to take forever to get the color mix right again, I try to document my „recipes“. Especially if you want to reproduce a certain color scheme, I can only recommend something like this. I got into the habit of doing this when I painted my 6 mm World War 2 miniatures in the different camouflage schemes of each country.
I basically use Vallejo colors, mainly from the Model Color Range with a few additions from Game Colors.
Quick tip: Create a color chart
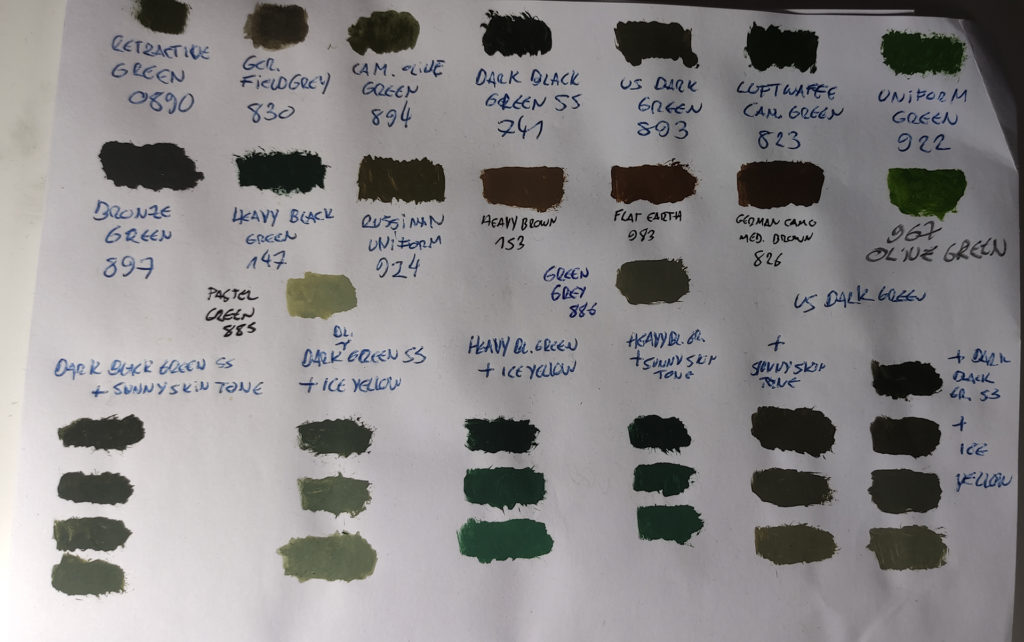
Since it’s hard to tell in advance how a color will really look, you can buy a color card from Vallejo that actually has all the colors painted on it. The images on the internet are distorted depending on the monitor settings and even the color in the pots sometimes looks different than after mixing with the brush.
I have created such a color card myself for some shades and also documented the mixing result with highlight colors like Sunny Skin Tone and Ice Yellow.
This is what it looks like, just quick and dirty, but for me it is very helpful:
Color Guide: Mukthar
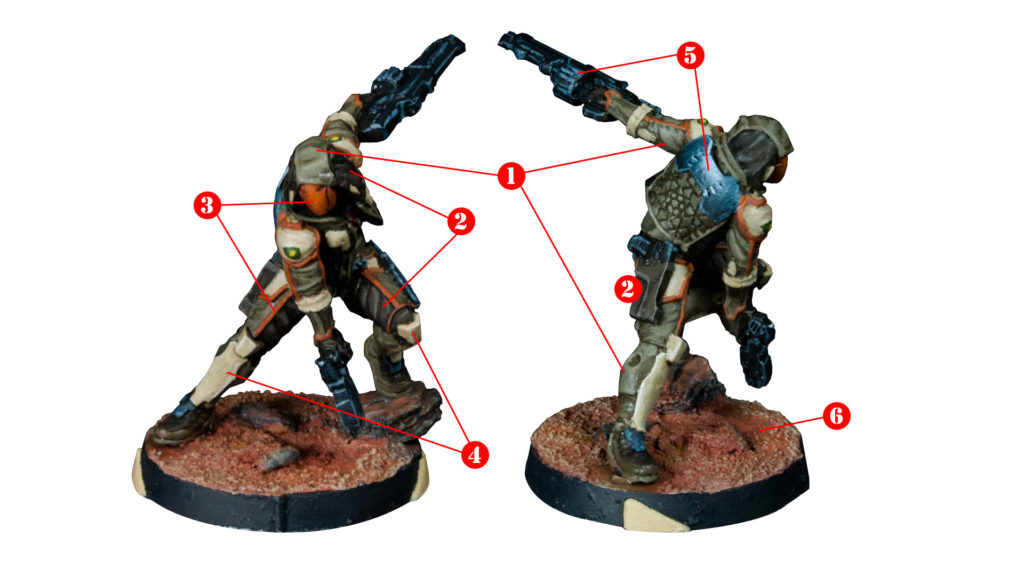
Color chart:
After adding the base colors, i do a wash with Army Paint Quickshade Soft Tone all over the miniature for shadowing. On metal parts i use Army Paint Quickshade Dark Tone. Restore the base color after that in the light areas and continue with the highlights. Add only a bit of highlight color for each layer. For varnishing i use two layers of Vallejo Matt Varnish 520 thinned with water.
| (1) Uniform light part | Base color | US Dark Green 893 + Heavy Brown 153 |
| Highlight | Add Dark Sand 847 to the mix | |
| (2) Uniform dark part (holster, leather) | Base color | 80% Flat Earth 983 + 20% Black 950 |
| Highlight | Add Dark Sand 847 to the mix | |
| (3) Orange mask, stripes | Base color | Cavalry Brown 982 + Orange Brown 981 |
| Highlight | Orange Brown 981 and Rust 131 (i know that might not be the intended use, but works ;)) | |
| (4) Protectors | Base color | A bit of US Dark Green 893 + Dark Sand 847 |
| Highlight | Add Dark Sand 847 and Ice Yellow 858 to the mix, finish with White 951 | |
| (5) Metal parts | Base color | German Grey 995 |
| Highlight | Add Periscopes 309 and White 951 to the base color, finish with pure white | |
| (6) Base | Base color | Orange Brown 981, Cavalry Brown 982, Heavy Brown 153; Germany Grey 995 for the rocks |
| Highlight | Add Dark Sand 847 to the mix and drybrush |
Color Guide: Khawarij
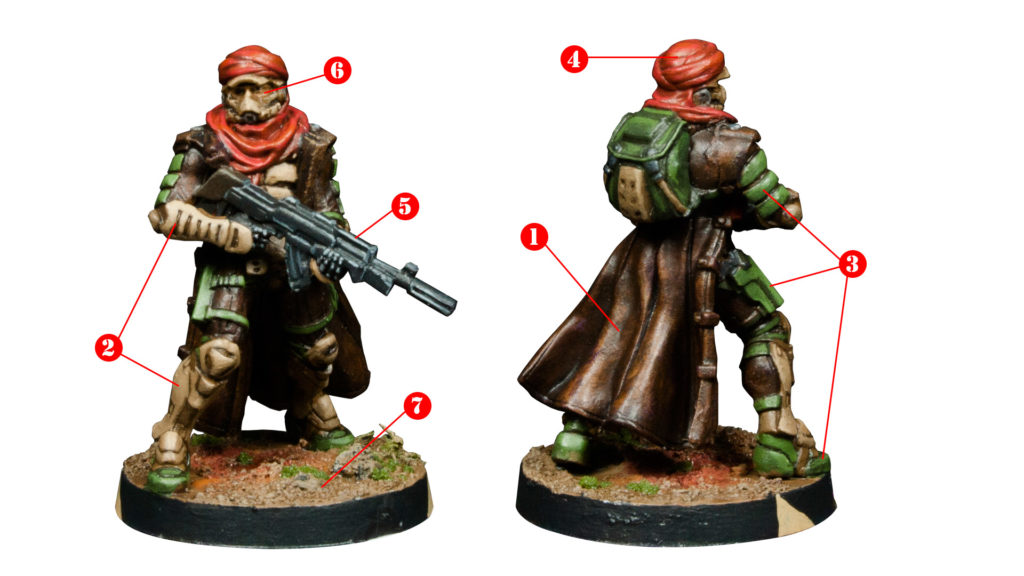
Color chart:
After adding the base colors, i do a wash with Army Paint Quickshade Soft Tone all over the miniature for shadowing. On metal parts i use Army Paint Quickshade Dark Tone. Restore the base color after that in the light areas and continue with the highlights. Add only a bit of highlight color for each layer. For varnishing i use two layers of Vallejo Matt Varnish 520 thinned with water.
| (1) Leather coat and pants | Process | 1. Base Color: Chocolate Brown 872 2. First highlight: Flat Earth 983 3. Second highlight: 50% Flat Earth 983 + Dark Sand 847 4. First Wash: Violet Ink 087 5. Second Wash: Smoke 068 6. Shading with Army Paint Quickshade Dark Tone Found in this guide |
| (2) Armor + Protectors | Base color | Heavy Brown 153 |
| Highlight | Add Dark Sand 847 to Heavy Brown 153, finish with Dark Sand 847 and eventually White 951 | |
| (3) Green parts (boots etc.) | Base color | Luftwaffe Cam. Green 823 |
| Highlight | Uniform Green 922, add Dark Sand 847 for finish | |
| (4) Red turban | Base color | Cavalry brown 982 |
| Highlight | Orange Brown 981 and a pure Red of your liking, add a bit of white for finishing | |
| (5) Metal parts | Base color | German Grey 995 |
| Highlight | Add White 951 to the base color, finish with pure white | |
| (6) Face | Base color | Cork Brown 843, add a bit of Orange Brown 981 or Cavalry brown 982 for details like cheeks and lips |
| Shading | Army Paint Quickshade Soft Tone | |
| Highlight | Add Dark Sand 847 | |
| (7) Base | Base color | Orange Brown 981, Cavalry Brown 982, Heavy Brown 153, Flat Earth 983; Germany Grey 995 for the rocks |
| Highlight | Add Dark Sand 847 to the mix and drybrush |
Color Guide: Al Fassid
After adding the base colors, i do a wash with Army Paint Quickshade Soft Tone all over the miniature for shadowing. On metal parts i use Army Paint Quickshade Dark Tone. Restore the base color after that in the light areas and continue with the highlights. Add only a bit of highlight color for each layer. For varnishing i use two layers of Vallejo Matt Varnish 520 thinned with water.
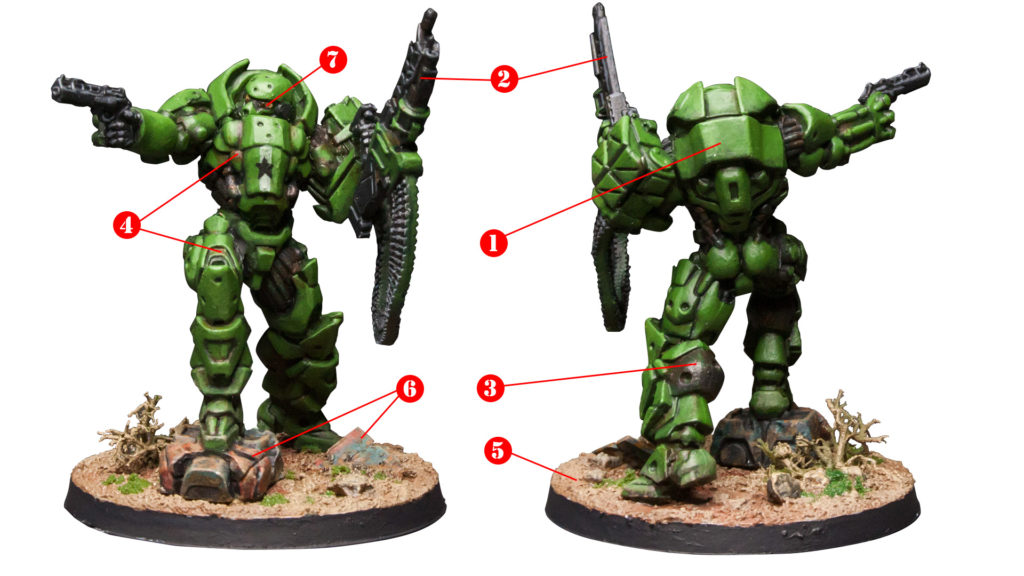
| (1) Armor | Base Color | Luftwaffe Cam. Green 823 |
| Highlight | Add Uniform Green 922, for highlighting the edges add Dark Sand 847 and White 951 | |
| (5) Metal parts | Base color | German Grey 995 |
| Highlight | Add White 951 to the base color, finish with pure white | |
| (3) Dark metal parts | Base color | German Grey 995 |
| Highlight | Luftwaffe Cam. Green 823 | |
| (4) Rust effects | Base color | Dry Rust 136 or Smoke 939 |
| Highlight | Rust 131 or Scrofulous Brown 038 | |
| (5) Base | Base color | Orange Brown 981, Cavalry Brown 982, Heavy Brown 153, Flat Earth 983; German Grey 995 for the rocks |
| Shading | Army Paint Quickshade Soft Tone | |
| Highlight | Add Dark Sand 847 to the mix and drybrush | |
| (6) Debris | Base color | Cavalry Brown 982 and Periscopes 309 |
| Highlight | Add Dark Sand 847 and White 951 | |
| (7)Eyes | Base Color | Dark Sand 847 |
| Shading | Army Paint Quickshade Soft Tone |
Color Guide: Hassassin Farzan
After adding the base colors, i do a wash with Army Paint Quickshade Soft Tone all over the miniature for shadowing. On metal parts i use Army Paint Quickshade Dark Tone. Restore the base color after that in the light areas and continue with the highlights. Add only a bit of highlight color for each layer. For varnishing i use two layers of Vallejo Matt Varnish 520 thinned with water.
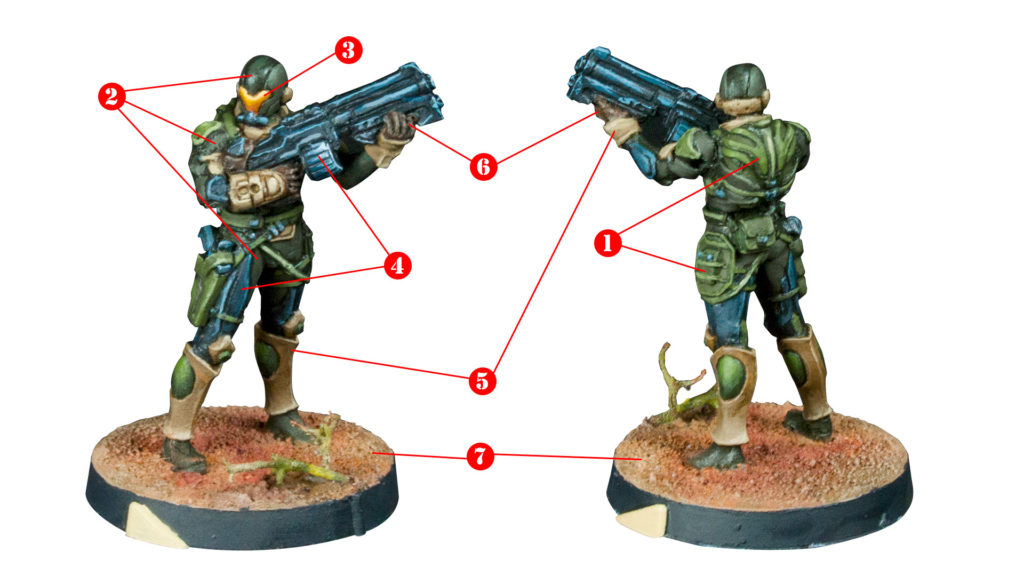
| (1) Backpack, Holster, Belts | Base Color | Camo. Olive Green 894 with a bit Olive Green 967 |
| Highlight | Add Olive Green 967 + Dark Sand 847 and White 951 | |
| (2) Mask, Pants and Shirt | Base color | Dark Green Black SS 741 (rare color, need to find an alternative)+US Dark Green 893 |
| Highlight | Add US Dark Green 893 + Dark Sand 847 | |
| (3) Visor | Base color | Orange Brown 981 |
| Highlight | Medium Flesh 860, Scrofulous Brown 038 and White 951 | |
| (4) Metal parts, Weapon | Base color | German Grey 995 |
| Highlight | Periscopes 309 + White 951 | |
| (5) Body armor | Base color | Heavy Brown 153 |
| Highlight | Add Dark Sand 847 to Heavy Brown 153 | |
| (6) Gloves | Base color | Chocolate Brown 872 |
| Highlight | Dark Sand 847 | |
| (7) Base | Base color | Cavalry Brown 982, Orange Brown 981, Cork Bown 843, Heavy Brown 153 |
| Highlight | Dark Sand+Cork Brown |
To be continued soon…


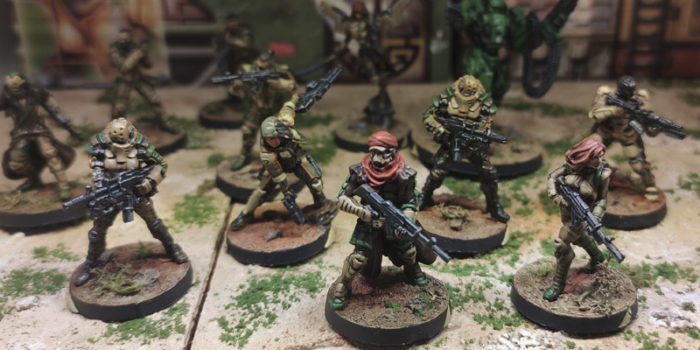
What a wonderful guide. Thank you for sharing.